
The Extend-A-Stay is a brass tee fitting that mounts between the propane tank and regulator. It has two functions.
Both of these options interested me, so I purchased one from a local RV center. The only negative I heard anywhere about this device (from one person) was that it could possibly break due to the weight of the regulator and vibrations while traveling. I figured out how to add a brace to support it, but figured it would be easier to remove the tank to do so. While I had the tank out, I figured I would inspect/sand/paint. I could also have the tank recertified. So, a simple thing ended up being a larger project than it really needed to be. You do not need to remove the tank to install this!
Tank recertification. I called ALL the local propane suppliers, and none had the ability to recertify tanks. I was very specific that I had a permanently mounted horizontal tank, and all of them told me "yes, it needs to be recertified". Well, they were all wrong!!
Most motorhomes have permanently mounted ASME "tanks". Most trailers, on the other hand, have portable DOT "cylinders". The DOT cylinders must be recertified 12 years after manufacture, and every 5 years after that. Vertical tanks up to 40 lbs must have OPD valves installed. On the other hand, ASME tanks don't need to be recertified, though they should be inspected as routine maintenance. Also, they have had OPD devices since the 80s. Why the propane suppliers did not know this information, I have no idea. By the way, I found this information out in the tech forum on www.rv.net. (OPD: Overfill Protection Device - prevents the tank from being filled more than 80% volume for expansion. ASME: American Society of Mechanical Engineers. DOT: Department Of Transportation).
First, I had to remove the tank. Should be simple. Raise the camper slightly, use a floor jack to hold it in place while removing the bolts, then lower the tank and slide it out from the camper. I ran into a problem removing the bolts. Coachmen used flat-head carriage type bolts, but the small amount of rust on the threads caused the whole bolt to turn. I had to locate the bolt heads under the carpet and then figure out a way to prevent them from turning. I ended up locating the bolt heads using a stud finder. I cut a small slit in the carpet. I drilled a 3/32 inch hole through the bolt head, close to the edge, and into the floor. I put a small piece of music-wire through the hole and into the floor - this kept the bolts from turning. I then disconnected the wire from the propane level sensor, and also the short rubber hose from the regulator. Dropped the tank without a problem.

Above is the tank after it had been sanded, and after some of the primer had been applied. I used Rustoleum paint in a spray can. I was very pleased with the results. At this point, I decided to temporarily mount the new gadget, and to fashion a support bracket, which screwed to the back of the regulator. Later, I decided to buy a new regulator and rubber hose. The white plastic under the regulator was to close in the bottom of the old regulator cover. In retrospect, I should have bought a new cover since the newer ones fit better than this one.
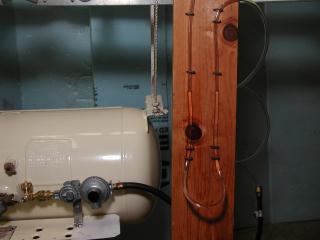
Above is the tank, extend-a-stay, new regulator and hose, and a homemade U-tube manometer to check the pressure output of the regulator. When the valve is opened, the pressure will cause the water on one side to drop, the other side to rise. The difference in height between the two is the pressure, in inches-water. Eleven inches water column of pressure is required, and is exactly the pressure of the new regulator. The tank in this picture has had the final coat of paint. Two coats of primer, two coats of color (colonial white).
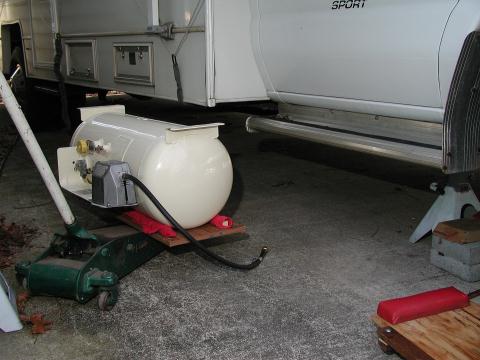
Above is the tank about to go back under the camper. I used a plank, with rags rolled around 1x2 lumber, to cradle the tank and keep from scratching the paint. The Rustoleum stays soft for a week or two until it thoroughly dries. I saved a small amount of paint in the last can, in case I needed to touch-up the tank, which I did not have to. Also in this picture, you can see the regulator cover, which is necessary to keep dirt and moisture from getting into the regulator.
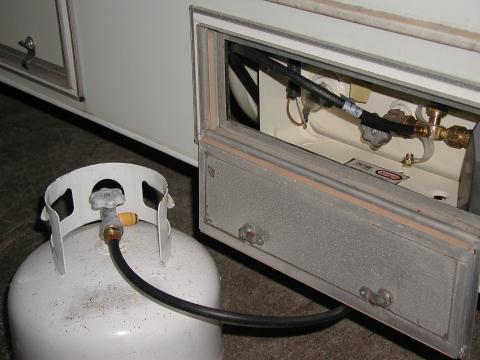
Here the tank is installed. In this picture, I have the POL hose connected from an external cylinder to the extend-a-stay fitting. This would allow the external cylinder to supply propane to the camper in case the internal tank is empty, or if you simply don't want to use the internal tank. This is good if you are parked for an extended time and don't want to move the camper just to fill the propane tank. If you were observant, you noticed the external cylinder does not have an OPD valve and will have to be updated and recertified before it can be refilled.
The top connection on the extend-a-stay fitting is used to connect another hose to external high-pressure devices that use the small 16oz disposable cylinders. This allows the camper's tank to supply these devices with propane so the disposable cylinders are not needed. The deluxe version of the Extend-A-Stay comes with this hose, or it can be purchases seperately.
To date, I have not used the new gadget except to test it. But, it is there in case I need it. I am glad that I took the tank out and painted it, however. I do plan to get a propane lantern that I can hang outside the camper, and I also have a propane stove I can use.